Empire basics
Empire planning and construction
Compare land, build across zones, plan administration and review refunds.
Reviewed
Terrain profiles, unused-land enrichment and the follow-up Perlin correction await compatible live deployment. The Perlin correction preserves existing empire territory, asset locations and a surrounding buffer. The correction preserving worker assignments during day change awaits the next game update.
Find productive land. Plan your capacity. Review your costs. Build with confidence.
Use Empire Planning to compare owned zones, order buildings across several locations, check administration capacity and review unfinished construction. Use World Map to claim more land.
About the pictures: interface captures use illustrative example data, not a live player account. Costs, yields, worker counts and the small sample map are examples. This guide follows the interface prepared for client 0.21.9; availability depends on your server release and permissions.
1 Find and compare owned zones
Open the main navigation, expand Empire, then choose Empire Planning. On smaller screens, open the navigation drawer first.
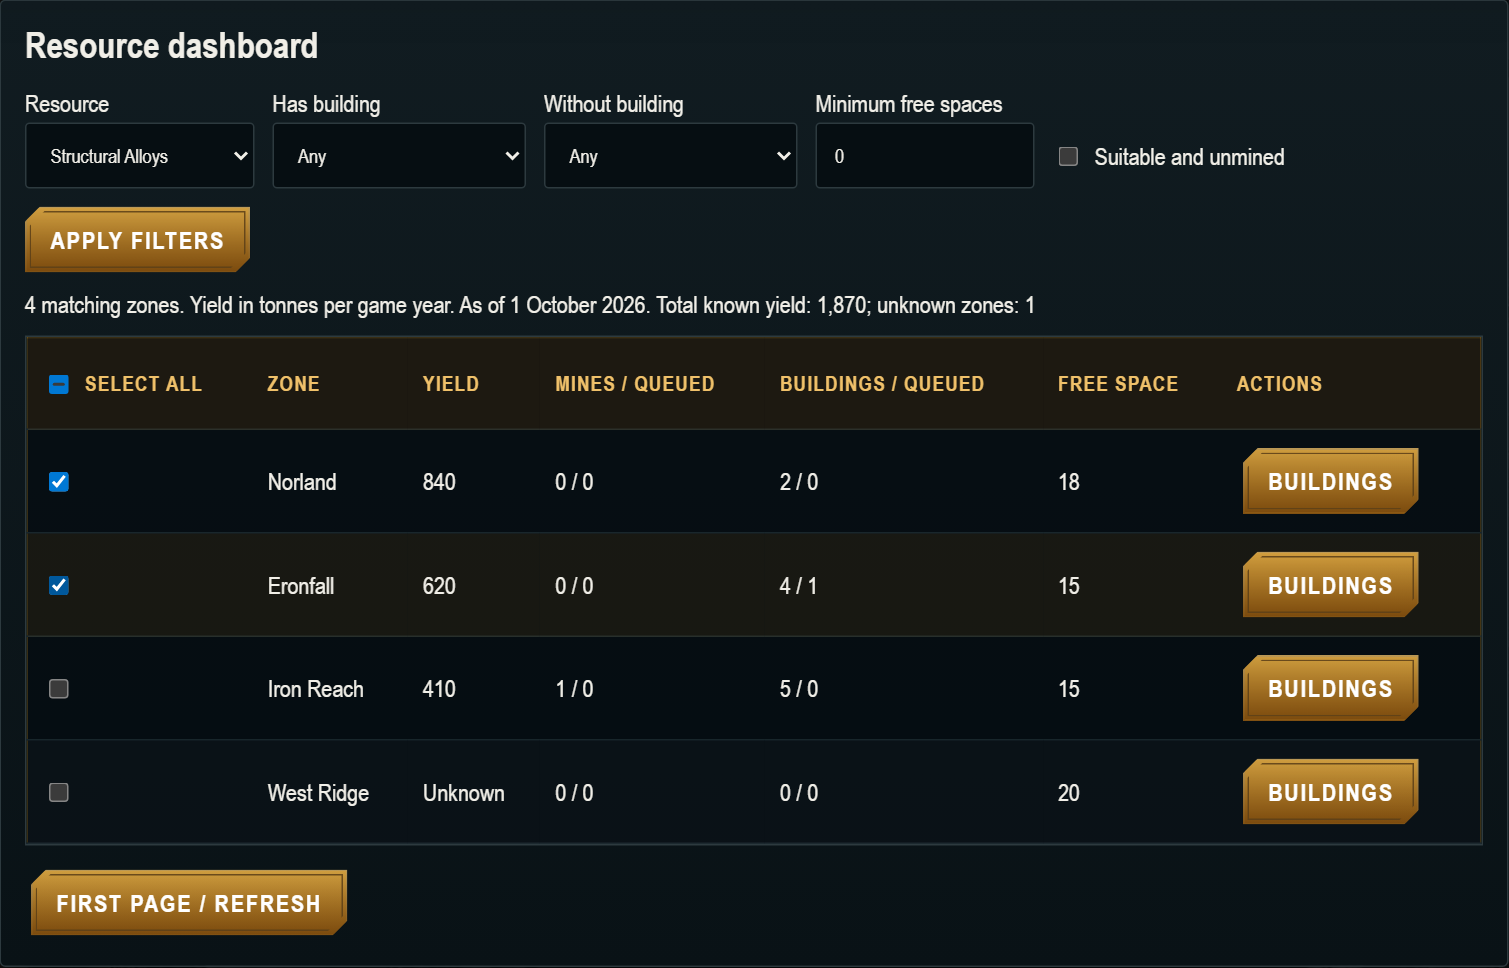
Figure 1. Resource dashboard: choose a resource, compare zones and select where to work.
1. Choose a resource. Use Resource to inspect Structural Alloys, Advanced Alloys, Fusion Materials, Electronics Alloys, Myomer Compounds or LOSTech Compounds.
2. Narrow the list. Set Has building, Without building or Minimum free spaces. Suitable and unmined helps find productive locations without an existing or queued mine for the selected resource. Click Apply filters.
3. Compare the results. Zones are ranked for the selected resource. Use the displayed units and check existing mines, queued work and free space together.
4. Select your zones. Tick individual rows or use Select all for the current page. Next 50 zones opens the next results page; selections on other pages are retained. First page / refresh reloads the first page.
| Column | How to read it |
|---|---|
| Yield | Resource yield in the displayed unit, currently tonnes per game year. Unknown means no known value; it does not mean zero. |
| Mines / queued | Existing mines for this resource / mines already in construction. |
| Buildings / queued | Completed buildings / buildings already in construction. |
| Free space | Usable space remaining after existing and queued occupancy. |
| Buildings | Opens the Buildings page for that row’s zone. |
Selection tip: Applying filters clears the selected zones. Review the selection count before previewing. Filter preferences are saved separately for each empire in this browser. Scroll down for the other panels; on narrow screens, scroll the table sideways.
2 Build across several zones
Example: order one Structural Alloys Mine in Norland and one in Eronfall, then review the combined price.
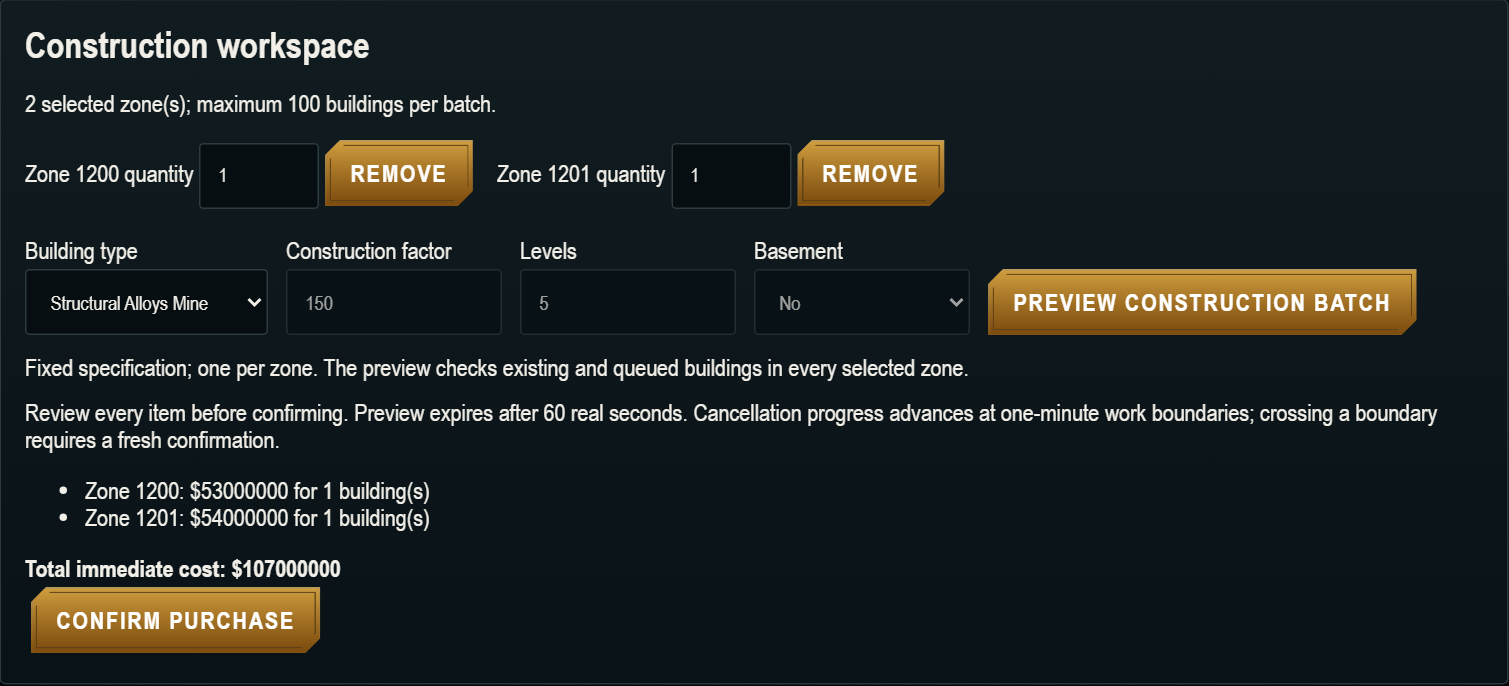
Figure 2. One building type, a quantity for each zone, and an itemized purchase preview.
1. Select zones in the dashboard. Scroll to Construction workspace and check the selected zone IDs. Use Remove to drop a zone.
2. Choose Building type. Each batch uses one building type and specification. Available choices depend on your empire’s research and capabilities.
3. Set each quantity and the design. Ordinary buildings allow Construction factor, Levels and Basement choices within their limits. Specialist types use fixed specifications and may lock quantity to one.
4. Click Preview construction batch. Check every zone’s result, any eligibility errors, and Total immediate cost. Previewing does not spend cash.
5. Click Confirm purchase. This submits the whole batch. Wait for Operation complete, then inspect Construction in progress or open Buildings for the relevant zone.
Batch limits: Select at most 100 zones and order at most 100 buildings in total. For example, 60 zones with two buildings each is too large. The game does not split an oversized batch automatically.
Before you confirm
A blocked or changed zone can stop the entire batch. Resolve the stated reason, request a fresh preview and review again. Changed selections, specifications or prices require a new confirmation; previews expire after 60 real seconds.
Immediate cost is the cash needed now. Prices can differ between zones as queued development affects Empire Development Efficiency (EDE). Do not assume that the first zone’s price applies everywhere, or that this preview is a forecast of future operating costs.
Mines, Administration and Military Bases use one-per-zone checks. Land Forge is limited to one per empire. Repair Bays use the separate Buildings workflow. Follow the eligibility explanation shown for your chosen type.
To remove completed repair bays, the empire owner can select their individual rows in Buildings and use Destroy Buildings. Move or dismiss technicians and close repair orders first. A busy, changed or unavailable bay blocks the entire selection, including selected ordinary buildings. Review each bay number and rebate before confirming. See Repair Bays for facility management.
3 Check administration capacity
The Administration capacity panel compares your empire’s needs with the capacity supported by its current workforce.
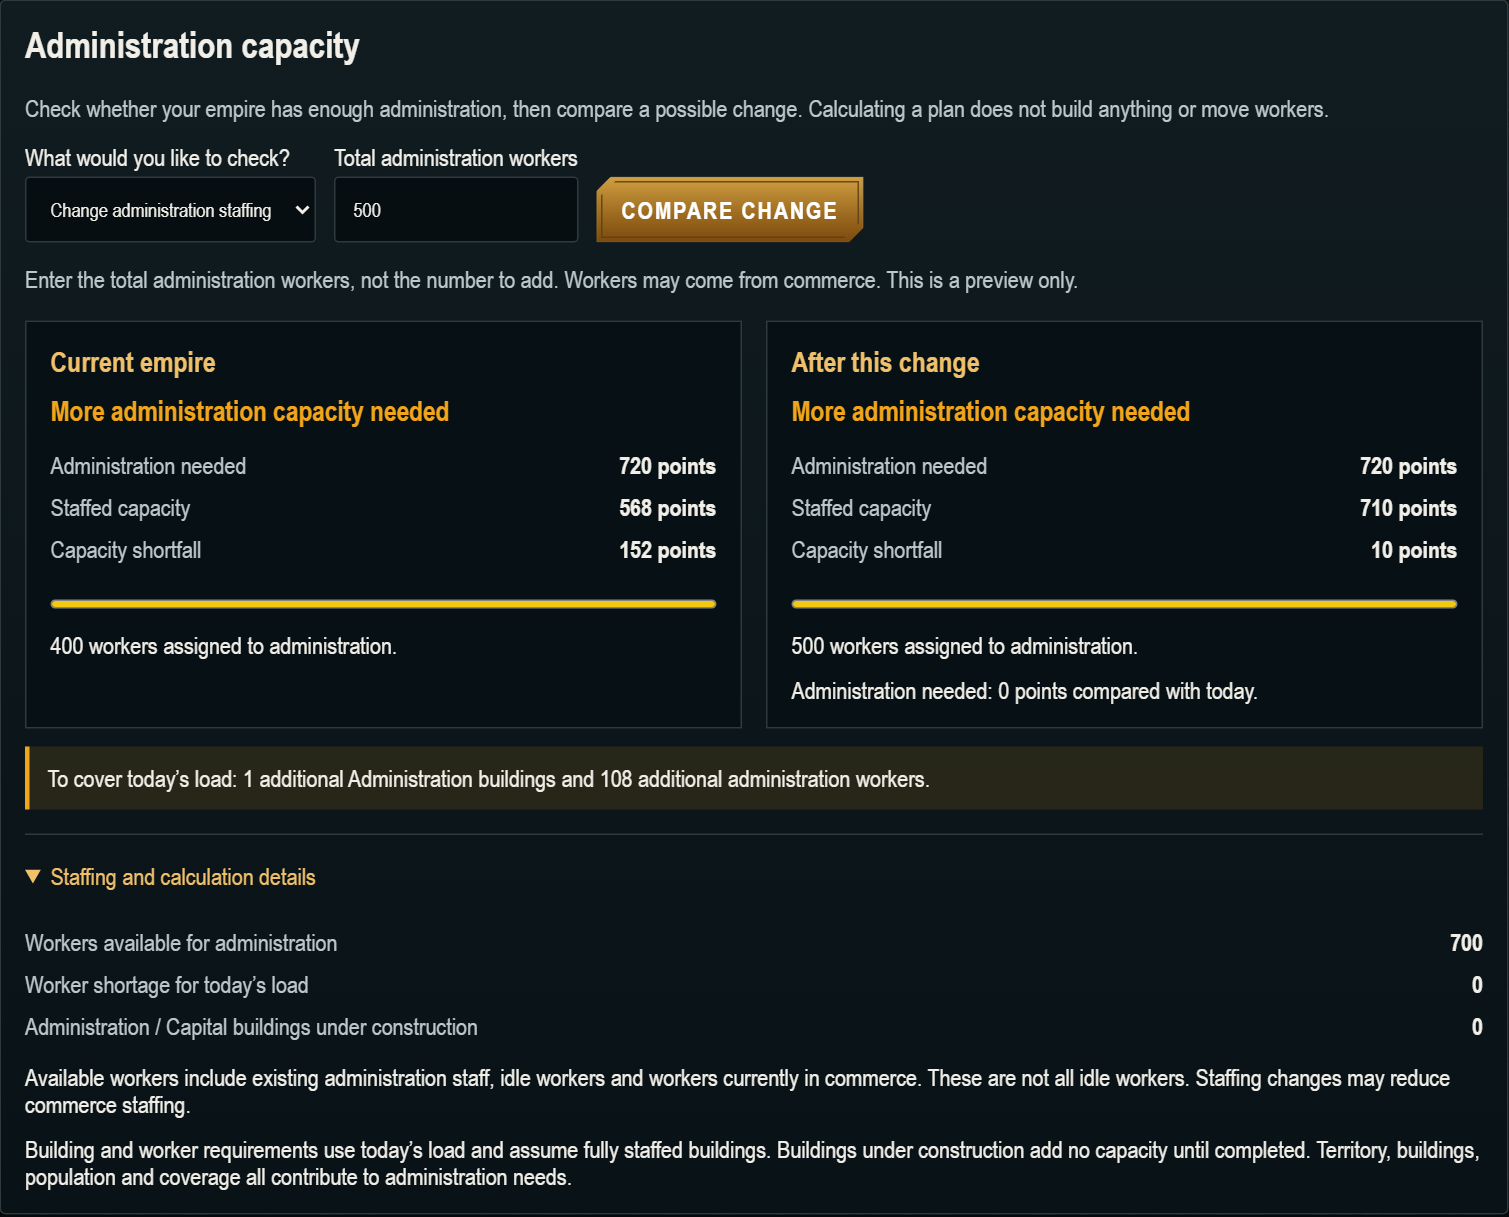
Figure 3. Example staffing comparison: more workers reduce the shortfall from 152 to 10 points, but do not remove it.
1. Check today’s position. Choose Current capacity and click Check capacity. This covers the whole empire, regardless of the zones selected.
2. Try a staffing change. Choose Change administration staffing, enter the desired total workers and click Compare change. Enter 500 to have 500 in total, not to add 500.
3. Try a building change. Select an owned zone above, choose Add an Administration building, choose Build in zone and click Compare change. This scenario keeps current staffing; the extra building may add no staffed capacity by itself.
4. Check the details. Expand Staffing and calculation details. Available workers can include current administration staff and workers in commerce, as well as idle workers. Moving them may reduce commerce staffing.
A plan changes nothing: Use Buildings → Empire Administration → Assign Workers to apply staffing. Use a construction purchase to order a building. Queued Administration buildings provide no capacity until completed; review capacity again after your changes.
Staffing during day change
A correction that preserves staffing changes saved during day-change processing awaits the next game update. Daily income processing will retain your saved assignments instead of restoring earlier staffing totals. Research and manufacturing keep their accumulated progress, and workers from completed reclamation return to the available workforce.
Higher-priority staffing and reduced workforce or building capacity can still reduce lower-priority assignments. After using Assign Workers, check the resulting Administration total and your research, manufacturing and reclamation staffing. Moving workers into Administration can legitimately leave fewer workers for those jobs and commerce.
View administration coverage on the map
Open World Map and enable the Administration layer to see your empire's Capital and Administration coverage. On phones, its short label is Admin. Reclaim controls Reclamation and Support controls Military Support separately. The Administration legend summarizes coverage; select an owned zone to inspect its effective hub and route details.
4 Cancel unfinished work
Select the owned zones containing the work, then scroll to Construction in progress.
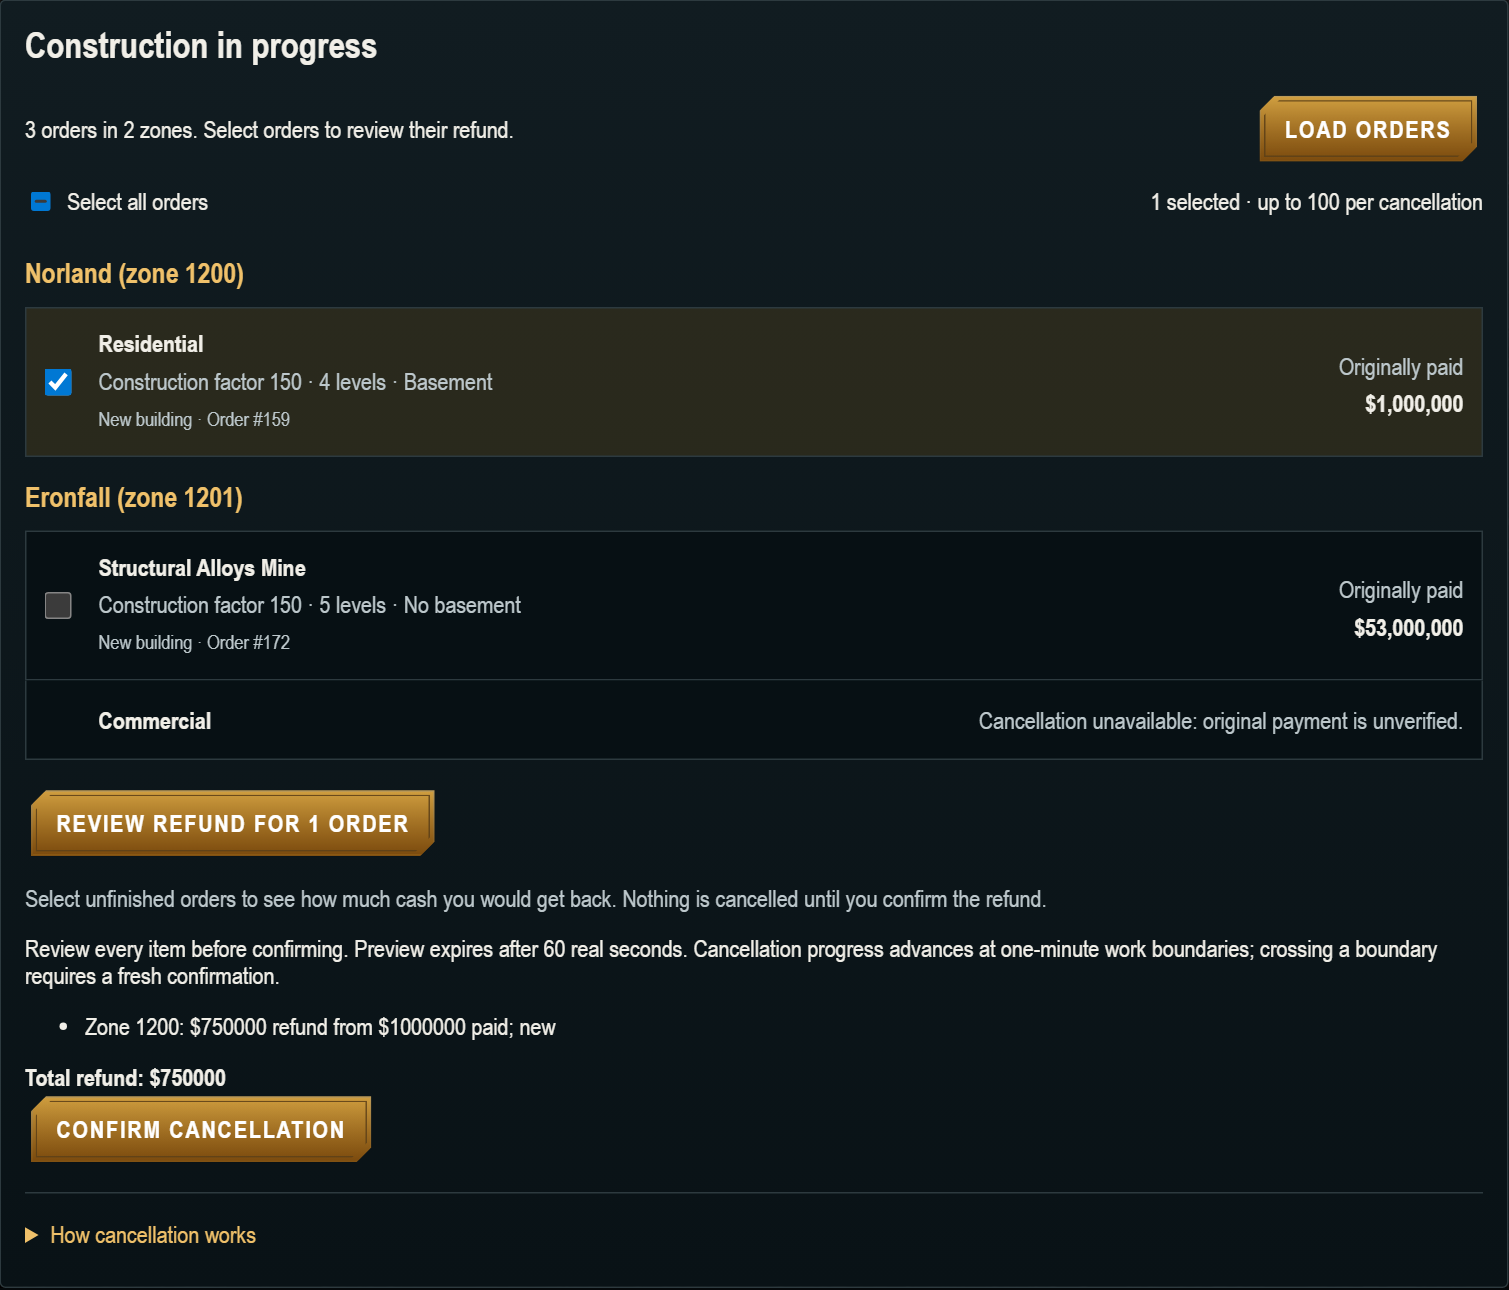
Figure 4. Orders are grouped by zone. Select an order, review its refund, then confirm cancellation.
1. Click Load orders. Check the zone, building type, specification and Originally paid amount for each order.
2. Select unfinished orders. Tick individual orders or use Select all orders. Cancellation is limited to 100 orders at a time; larger lists offer Select first 100 orders.
3. Click Review cancellation refund. The button includes the number selected. Read the individual refund lines, any restoration details and Total refund.
4. Click Confirm cancellation. Only this confirmation submits the cancellation. Wait for Operation complete, then check the updated cash, orders and zone space.
Read the result before confirming: A tower cancellation retires that tower inventory item and returns cash only. An upgrade cancellation restores the original building. See the next page for the differences.
An older order marked “Cancellation unavailable: original payment is unverified” cannot be selected here. Completed work is no longer eligible for an unfinished-work refund. Changing selected zones clears the loaded order list, so load it again for the new selection.
5 Understand refunds and Buildings
Cancellation returns the unbuilt share of the recorded original payment, using progress confirmed by the game server.
Refund example: If the selected work originally cost $1,000,000 and is 25% complete, its unbuilt share is 75%, so the illustrative refund is $750,000. The server’s displayed refund is the amount to review.
| What you cancel | What happens |
|---|---|
| New building | The unfinished order is removed. The unused share of its original payment is refunded and its reserved space is released. |
| Building upgrade | The original building and specification are restored. The refund covers only the unfinished share of the incremental upgrade payment. The original building still occupies space; incomplete upgrade progress is lost. |
| Tower construction | The tower inventory item is retired. The refund uses the unfinished share of attributable cash actually paid. No intact tower or components are returned, and there is no additional destruction rebate. |
| Completed or unverifiable work | Completed assets are outside unfinished-work cancellation. Older orders with unverified original payment or progress cannot use this refund workflow. |
Refunds use the original amount paid, not today’s price or discount. The game rounds refunds down to its supported currency precision. Work with no original cash payment returns no cash.
Cancellation progress advances at one-minute work boundaries. If progress changes while you are reviewing, the game can require a fresh preview and confirmation. A completed item cannot also receive an unfinished-work refund.
Open a specific zone in Buildings
1. Return to the resource dashboard. Find the zone and click its Buildings button. This opens that zone’s completed buildings and Construction & Upgrades list.
2. Wait for the details to load. Use the status line above the construction table. If completion information is unavailable, let the page refresh before relying on the dates.
3. Use the zone’s controls. Add Buildings starts the existing single-zone workflow. Select completed buildings before using Upgrade Buildings. Use Empire Administration for the actual workforce assignment.
4. Move to another zone. Return to Empire Planning and use that row’s Buildings action. There is no previous/next zone picker on Buildings in this interface.
Keep these actions separate: Destroy Buildings applies to completed assets and has its own rules. It is not a shortcut to the unfinished-construction refund. Tower placement remains in Tower Command; review unfinished tower cancellation in Empire Planning. Delegates need both building and military access to cancel towers.
6 Claim land on World Map
Open Empire → World Map. Claiming acquires land; construction is ordered separately after you own it.
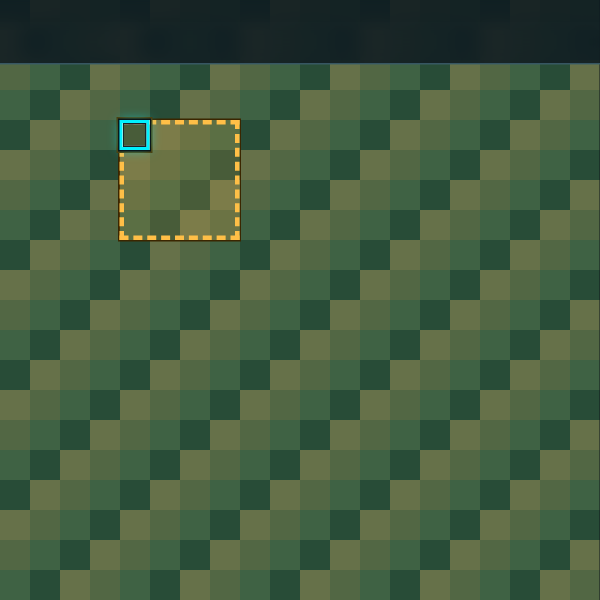
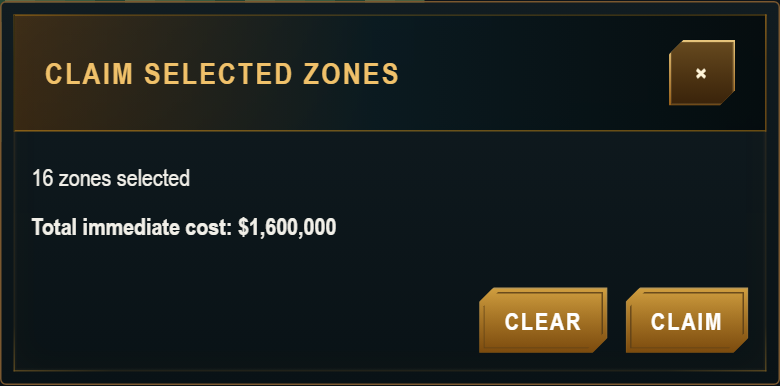
These pictures use a small illustrative map and example prices, not a live world.
1. Drag over the land you want. Press and hold on the map, drag to the opposite corner and release. Mouse, pen and touch dragging are supported. Escape cancels an active drag.
2. Review the automatic quote. The Claim selected zones popup opens after release. Check the number of selected zones and Total immediate cost. Selecting land does not claim or reserve it.
3. Resolve any rejection. Your own zones and water are ignored by the claim quote and are not charged. Foreign-owned or otherwise invalid land can block the entire claim. Use Clear or Close, then drag a corrected area.
4. Click Claim to purchase. Claim submits the batch and closes the popup. Ownership updates after success. If the quote changed or the request is rejected, the popup can reopen for review; closing alone is not proof of success.
Selection limit: A claim batch is limited to 100 candidates. Your already-owned zones are skipped; water may still count toward the initial selection limit before the server classifies it. If the outline turns red or the limit message appears, clear and drag a smaller area.
Clear and Close both dismiss the popup and clear the selection without purchasing. The current batch popup has no individual add/remove or two-corner buttons. To claim a single inspected zone, use the separate Claim Zone action when available; normal ownership, adjacency and affordability rules still apply.
7 Troubleshooting and quick reference
Read the message beside the action first. It usually identifies the next step.
| What you see | What to do |
|---|---|
| Empire Planning is missing | Confirm you are in the intended empire. A delegated account needs building access. Availability also depends on the release running on your server. |
| No matching zones | Choose broader filters, reduce Minimum free spaces or clear Suitable and unmined, then Apply filters. The dashboard lists owned zones. |
| Unknown yield | Treat the resource value as unavailable. Refresh later; do not assume zero yield. |
| Disabled design fields | Fixed-specification buildings control these fields automatically. Read the building-rules message for research and quantity restrictions. |
| Preview rejected / confirmation disabled | Read each reason. Check funds, research, ownership, free space and existing or queued buildings. Correct the selection and preview again. |
| Preview expired / settings changed | Request a new preview and review the new values. Confirm again only when the new result is acceptable. |
| Purchases or cancellations switched off | Wait until your server makes them available, then request a fresh preview. An earlier disabled quote does not become usable automatically. |
| Waiting for the server / checking automatically | Allow the pending operation to resolve before trying another purchase. Reopen the same page in the same browser and empire after reconnecting. Do not clear browser storage to bypass the pending state. |
| Browser storage is unavailable | The purchase was not sent. Allow site storage, then request a new preview before trying again. |
| Construction details unavailable | Wait for empire and zone details to refresh. Reopen the affected zone if needed; do not treat a missing date as completed construction. |
Your final check before each action
For a purchase: correct empire, correct zones, correct type and quantities, acceptable total cost. For a cancellation: correct orders, acceptable refund, and understood restoration or tower retirement. For a claim: correct area, eligible land and acceptable total price.
Useful limits: 50 resource rows per results page • 100 selected construction zones • 100 buildings per purchase batch • 100 orders per cancellation • 100 claim candidates • 60 real seconds per preview.
The built-in Empire Planning tutorial walks through the dashboard, construction workspace, administration panel and unfinished orders. On smaller screens, use vertical page scrolling and horizontal table scrolling to reach every control.
Edition note: prepared from the current Empire Planning, Buildings, Tower Command and World Map interface on 1 October 2026. The implemented interface takes precedence over earlier proposal controls. All examples are illustrative.
Terrain and connected waterways
The updated World Map shows Plains, Forest, River or Mountain as the selected-zone Type when that zone has a terrain profile. Sandy beaches continue to show Sand. A one-time world update adds these profiles to unused, unclaimed land while keeping the existing coastline and zone layout. Current empire territory, zones with buildings or units, recorded construction sites and a surrounding zone of land retain their previous terrain.
Rivers meander through unused land in connected routes to existing water and meet across zone boundaries. Existing river systems that touch protected territory keep their routes. Forests form irregular patches of different sizes, and mountains follow uneven ridges. Rivers are more widely spaced, with winding routes instead of a dense, repeating network. Resources, ownership and building capacity stay the same. A newly claimed zone keeps its recorded profile when you open its tactical placement map; viewing or claiming land cannot reroll it.
This update is verified in development and awaits the compatible live game update.
After the follow-up terrain update is installed, eligible unused land uses Perlin-generated woods and hills on its tactical maps instead of repeating bands. Claimed territory, asset locations and the surrounding protected land keep their existing battlefield. The update keeps river connections and the coastline in place. Reopening an upgraded map reproduces its saved layout; it does not generate a different battlefield each visit.
A previously claimed zone can still show its older terrain after the unused-land update because claimed land is protected. Selecting another zone or reopening the map does not upgrade it. Report the zone number if an empty claimed map needs review; a targeted repair must preserve ownership and check for assets before changing the battlefield.
A further terrain correction removes the artificial flat frame and trenches from eligible tactical maps. Access paths follow natural heights with gentle river approaches. Existing maps need that update applied before their appearance changes; occupied terrain remains protected.
Claiming a zone uses its saved terrain; it does not generate a new map. After the existing-land density correction is installed, eligible unused Mountain zones receive fewer trees and less rough ground before future claims. Owned zones and land near existing assets retain their terrain unless a specific empty-zone correction is provided. Mountain heights and the world coastline stay the same.
The mountain update adds more varied peaks, valleys and slopes to eligible unused mountain land. Existing occupied zones keep their saved battlefield and placements. The world update must be installed before those unused maps change.